Customisation Template Johny Sompret Banget

In the article yesterday, I give you Johnny Banget template created by MasTemplate, you can see the article here. And this time I will deliver Johny how to customize the template to fit the example on the blog Johny.

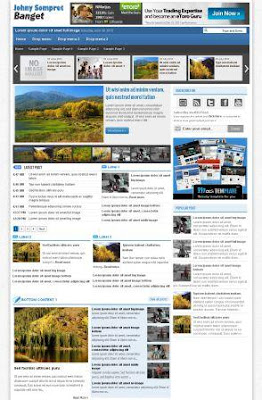
Let us get on with it, look at this template :
Johny Sompret Banget Easy Blogging

Customisation :
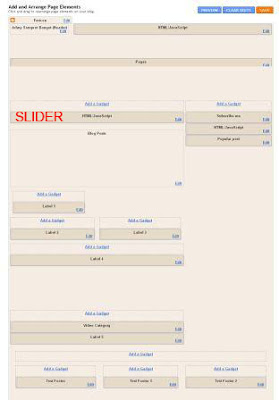
Edit Layout
I deliberately use the Old Blogger Interface layout to facilitate all appearance, because if there is a new blogger layout scroll feature so it can not get to the bottom. Here's how the installation of the features that exist in this template:

  1. Link News
    To replace it you find the link http://johnysompret-banget.blogspot.com/ then remove and replace with your blog address.
  2. Slider
    Slider works on the template automatically displays the latest post, How to set it up, look at the column layout that I gave above posts slider. Then enter the following code into it:
    <div id='featuredContent'>
    <div id='slideshow'>
    <div id='slideshowThumbs'>
    <ul> <script>
    document.write ('<script
    </ Script> </ ul>
    </ Div>
    <div class='post' id='slideshowContent'>
    <script>
    document.write ('<script
    </ Script> </ div>
    </ Div>
    <script type='text/javascript'>
    $ (Function () {
    $ ("# SlideshowThumbs ul"). Tabs ("# slideshowContent> div ', {
    effect: 'fade',
    fadeOutSpeed: 1000,
    rotate: true
    }). Slideshows ({
    clickable: true,
    autoplay: true,
    interval: 3000
    });
    });
    </ Script>
    <div class='clear'>
    </ Div>
    </ Div>
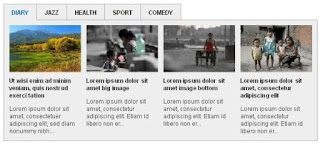
  3. Tab View Widget by Label
    Tab View Widget by Label
    Note the picture above, to change the title of the tab (diary, jazz and so forth) find the following code in the Edit HTML:
    TITLE1 = "DIARY"; TITLE2 = "JAZZ"; TITLE3 = "HEALTH"; TITLE4 = "SPORT"; TITLE5 = "COMEDY"
    If you have found, replace blue writing above the title you want to display on the tab view widget category.

    While to fill the widget with the label, still in Edit HTML find the following code (do not forget to tick the expand widget templates):
    <div class='tabber' id='tab1'>
    <script>
    document.write(&quot; &lt;script src=\&quot;/feeds/posts/default/-/sport?max-results=&quot;+numposts9+&quot;&amp;orderby=published&amp;alt=json-in-script&amp;callback=showrecentposts9\&quot;&gt;&lt;\/script&gt;&quot;);
    </script></div>
    <div class='tabber' id='tab2'>
    <script>
    document.write(&quot; &lt;script src=\&quot;/feeds/posts/default/-/lifestyle?max-results=&quot;+numposts9+&quot;&amp;orderby=published&amp;alt=json-in-script&amp;callback=showrecentposts9\&quot;&gt;&lt;\/script&gt;&quot;);
    </script></div>
    <div class='tabber' id='tab3'>
    <script>
    document.write(&quot; &lt;script src=\&quot;/feeds/posts/default/-/economics?max-results=&quot;+numposts9+&quot;&amp;orderby=published&amp;alt=json-in-script&amp;callback=showrecentposts9\&quot;&gt;&lt;\/script&gt;&quot;);
    </script></div>
    <div class='tabber' id='tab4'>
    <script>
    document.write(&quot; &lt;script src=\&quot;/feeds/posts/default/-/diary?max-results=&quot;+numposts9+&quot;&amp;orderby=published&amp;alt=json-in-script&amp;callback=showrecentposts9\&quot;&gt;&lt;\/script&gt;&quot;);
    </script></div>
    <div class='tabber' id='tab5'>
    <script>
    document.write(&quot; &lt;script src=\&quot;/feeds/posts/default/-/health?max-results=&quot;+numposts9+&quot;&amp;orderby=published&amp;alt=json-in-script&amp;callback=showrecentposts9\&quot;&gt;&lt;\/script&gt;&quot;);
    </script></div>
    <div class='clear'>
    </div>
    Red writing above is my fifth label on the widget tab enter this category, you simply replace it with your label and adjust the view tab titles that have been made​​.
  4. Label Widget
    Are included in the label widget in this template layout is: Label 1, Label 2, 4 Labels, 4 Labels, Label 5 and Video Category. You can just enter the name or type a label that you have created on the box. Like the example shown below:
    widget label
  5. Subscribe me widget
    It is located on the right sidebar at the top, still in the layout and then select the HTML / Javascript and enter the following code in it:
    <style type='text/css'>
    .social a{color: #6e6e6e;font: bold 12px Calibri,Helvetica, Arial, sans-serif;text-decoration: none;padding: 3px 5px 2px;position: relative;display: inline-block;text-shadow: 0 1px 0 #fff;-webkit-transition: border-color .218s;-moz-transition: border .218s;-o-transition: border-color .218s;transition: border-color .218s; background: #f3f3f3;border: solid 1px #dcdcdc;}
    .social a:hover {color: #333;border-color: #999;-moz-box-shadow: 0 2px 0 rgba(0, 0, 0, 0.2);-webkit-box-shadow:0 2px 5px rgba(0, 0, 0, 0.2);box-shadow: 0 1px 2px rgba(0, 0, 0, 0.15);}
    .social a:active{color:#000;border-color: #444;}
    .sub-box{width:300px;background:();padding: 2px 5px 7px 2px;font-family:Droid Sans,Helvetica,Arial;}
    .emailform{margin:16px 0 0; display:block; clear:both;}
    .emailtext{margin:10px 0 0;background:#f6f6f6 url(https://blogger.googleusercontent.com/img/b/R29vZ2xl/AVvXsEg09KpeS4yPeI0wniEfT5jFEIGPwboKI95cAqhOHsgrwBf2g_FmqeW65mo3fJeVBVmumtuYKojumt1BgB7gvodb_fk-C91WXygkCYbzheW0BDsFk94-1uw-eozc3jemUyU3cWI31RQG6i0/s1600/email.png) no-repeat scroll 4px center;padding:6px 5px 6px 34px;color:#444;font-weight:bold; text-decoration:none;border:1px solid #ccc;width:175px;}
    .emailtext:hover{background: #f3f3f3 url(https://blogger.googleusercontent.com/img/b/R29vZ2xl/AVvXsEg09KpeS4yPeI0wniEfT5jFEIGPwboKI95cAqhOHsgrwBf2g_FmqeW65mo3fJeVBVmumtuYKojumt1BgB7gvodb_fk-C91WXygkCYbzheW0BDsFk94-1uw-eozc3jemUyU3cWI31RQG6i0/s1600/email.png) no-repeat scroll 4px center;border-color:#999;}
    .emailtext:focus{outline:none;}
    .sub-button{color:#eee;font-weight:bold; text-decoration:none;padding:5px 10px; border:1px solid #666;cursor:pointer;background:#999}
    .sub-button:hover{color:#444;border-color: #999;background:#ccc}
    </style>
    <center><div class="social" style="padding: 0pt 0pt 0pt 5px;">
    <table><tbody><tr><td>
    <a href='http://feedburner.google.com/fb/a/mailverify?uri=maskolis' target='_blank'><img alt='newsletters' src="https://blogger.googleusercontent.com/img/b/R29vZ2xl/AVvXsEiOD7PmGWxPOYWTCsr-nv2395E3Dp5HwNh4kNUH6OEN5nLvRa-Z3wIWhDe3BO7FmXBE0NFiElmli-MMJDo9B0AIMsoSXV0Ev6QFd93tGWI3Fv09YuoB5SiPHAttvce-T2Wjig5iWT6QvSM/s1600/mail.png" border="0" title='newsletters'/></a> </td>
    <td> <a href='http://feeds.feedburner.com/maskolis' target='_blank'><img alt='rss' src="https://blogger.googleusercontent.com/img/b/R29vZ2xl/AVvXsEgfFnLET9G4qaH1_C9Bn5pOcEQeLbP-OczlGeybyEgozc8JseD5DHE3Bc_dl_QdzMSvgdXsB5mE64u8HEM2jQQR9eM_FgOUZEI_0fRlsmkN6xYKsRSuf4zFGao5VUIxImlgnb8rIkJDgW8/s1600/rss.png" border="0" title='rss'/></a> </td>
    <td> <a href='http://twitter.com/maskolis' target='_blank'><img alt='twitter' src="https://blogger.googleusercontent.com/img/b/R29vZ2xl/AVvXsEj8I2g3OIuEDNLl1ebwySicMuyz0nZ3_bnYrDEB1GpU537nKsD3q0tcHPLdKA9VFjbKSCseF9QgMvTxKp1jQKf4xWIuipLs-yA8mcbrMvbRAEifNuIAMyAv6FaI2VK7k1zAhWqgj6C3Sfg/s1600/twitter.png"  border="0" title='twitter'/></a> </td>
    <td> <a href='http://www.facebook.com/maskolis' target='_blank'><img alt='facebook' src="https://blogger.googleusercontent.com/img/b/R29vZ2xl/AVvXsEj0ez6dWDnN-nEHVI_8ylit9UxxiixgGnbINbzcjDL1tX8ctVek_4Igcn947nanpVFLEUjpAQikm5gDZLWxJyLCAv79G2pZ0cNxqA-WR_rEIaqSsoBmTmgNItXooP4R-qHw8xqmi41g2AU/s1600/facebook.png"  border="0" title='facebook'/></a> </td>
    <td> <a href='http://www.youtube.com/maskoli' target='_blank'><img alt=' youtube' src="https://blogger.googleusercontent.com/img/b/R29vZ2xl/AVvXsEjbaU8HPqYvLB-d9ZR_29mNK9oX1rJ0WdDwGQZX-LgOfO1V3djopuratqDDhp1qeOWgqViRWIaHWfH3Cn39CtM3zTJ4h57vykq-sqwH5W3kaRdFMNl3nqZ19z4mKDhF2tnyfEauEAftVAc/s1600/youtube.png"  border="0" title='youtube'/></a>
    </td></tr></tbody></table> </div></center>
    <center>
    <div class='sub-box'>
    <div style="text-align: left; display: inline-block;">
    <h8 style="display:block;font-family:'calibri';font-size:15px;font-weight:bold;">Subscribe via RSS Feed</h8>
    <small><i>If you enjoyed this article just <a href='http://feeds.feedburner.com/JohnyTemplate' target='_blank' title='feedburner'>
    <b>click here</b></a>, or subscribe to receive more great content just like it.</i></small>
    <form action="http://feedburner.google.com/fb/a/mailverify" method="post" target="popupwindow" onsubmit="window.open('http://feedburner.google.com/fb/a/mailverify?uri=maskolis', 'popupwindow', 'scrollbars=yes,width=550,height=520');return true">
    <input type="hidden" value="maskolis" name="uri"/>
    <input type="hidden" name="loc" value="fr_FR" />
    <input type="text" onblur="if (this.value == &quot;&quot;) {this.value = &quot;Enter your email...&quot;;}" onfocus="if (this.value == &quot;Enter your email...&quot;) {this.value = &quot;&quot;}" value="Enter your email..." name="email" class="emailtext" />
    <input type="submit" class="sub-button" value="Enter" title='' alt='' />
    </form></div></div></center>
    Replace red writing with your account
  6. Comment reply
    To activate the komantar reply to this template, change the template ID on this Blog on Edit HTML (do not forget to check expand widget templates): 6056708173853814595 after the meet change with your blog ID.
  7. Done, now you can look at the result

Out Of Topic